Importing Projects from SVN

Once projects are placed on the SVN repository, they can be checked out (imported) by anyone with access to that repository. SVN repository connections allow you to import projects from your repository to your workspace, which you can make and upload changes to.

This procedure describes how to import (check out) projects from an SVN repository location to your desktop.

Note:

If you have resources on your file system which are already linked to SVN, you can access them in Zend Studio by following the instructions under Accessing an Existing SVN Checkout.


Instructions on how to complete a procedure

To import a project from an SVN repository:

  1. Go to File Import | SVN | Projects from SVN.

  2. Click Next.

  3. Select your repository.
    If you have not yet created a repository, enter the information required to identify and connect to the repository location:

  • URL - The URL on which your repository is located.

  • Label - Select whether to use the URL as the repository's name or to enter a new name.

  • Authentication - The user name and password you use to connect to SVN.
    Mark the Save password checkbox so that the password will be automatically inserted in the future.

  1. Click Next.

  2. A "Select Resource" dialog will appear. Expand the nodes until you see the required project.

  3. Select your project and click Finish.
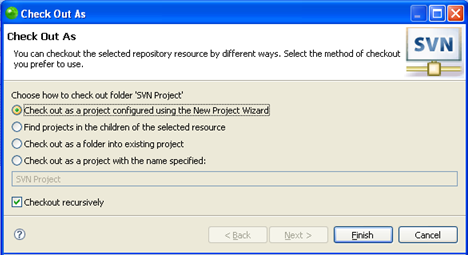
    A "Check Out As" dialog will appear.

  1. Select one of the following options:

  • Check out as project configured using the "New Project" wizard - Imports the project as a new PHP project into your workbench with the project's existing name.

  • Find projects in the children of selected resource - Imports all folders within the project as separate projects.

  • Check out as folder into existing project - Imports the project as a folder into an existing project in your workbench.

  • Check out as project with the name specified - Imports the project as a new project into your workbench with a new name. Specify the new name in the box.

Note:

To enable all Zend Studio's PHP functionality for the imported projects, select the 'Check out as a project configured using the New Project Wizard' option and ensure you create the new project as a PHP project.

  1. Click Finish.

The project will now be imported into your workspace.
Note that the project will have an SVN repository icon in your PHP explorer view.

Once you have imported a project from SVN into your workspace, you can now add files, edit existing files and commit your changes to the SVN repository.

Note:

Projects can also be checked out from SVN through the SVN Repository Exploring perspective, accessible from Window | Open Perspective | Other | SVN Repository Exploring. Simply right-click the project in SVN Repositories view and select Check Out or Find | Check Out As..

See theSubversive User Guidefor more information on SVN.

Note:

Additional user guides can be accessed from inside Zend Studio by going to Help | Help Contents, or from the Eclipse Online Documentation site (http://help.eclipse.org/neon/index.jsp).