Creating a Database Connection Profile

This procedure describes how to create a connection profile to your database, allowing you to easily connect to it through the Database Development perspective.


Instructions on how to complete a procedure

To create a JDBC connection profile:

  1. In the PHP Perspective toolbar, click the  Create New SQL Connection icon
    -OR-
    in the Database Development perspective (Window | Open Perspective | Other | Database Development), click the Create New SQL Connection icon  in the Data Source Explorer view or on the main Toolbar -or- right-click SQL Databases and select New.

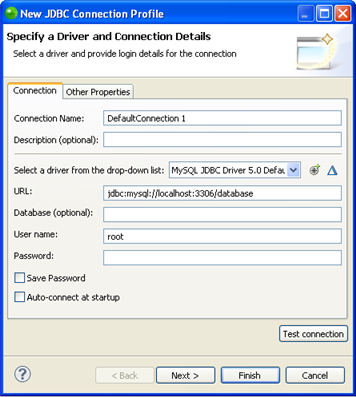
  2. The New JDBC Connection Profile wizard opens.

New Connection Profile dialog

  1. Enter the following information:

  2. Connection Name - Give your connection a name

  3. Description - Enter a description for the connection (optional).

  4. Driver - Select a pre-defined driver from the drop-down list. The following drivers are pre-configured in Zend Studio :

  • DB2

  • SB2 i-series

  • Derby

  • MySQL

  • Oracle

  • Postre SQL

  • SQL Server

  1. To create a new driver definition, click the New Driver Definition button to the right of the drop-down list. See Creating a Driver Definition for more information.

  2. To edit an existing driver definition, click the Edit Driver Definition button to the right of the drop-down list. See Editing a Driver Definition for more information.

  1. The URL that corresponds to the selected driver will be automatically entered in the URL field.

  2. Edit the URL according to your database's details.

  3. Enter the database name, if required.

  4. Enter the User Name and Password for your Database connection.

  5. Select whether the password should be saved by un/marking the corresponding checkbox.

  6. Select whether the database connection will be re-established when Zend Studio is started by un/marking the corresponding checkbox.

  7. Click the Test Connection button to ensure all the details have been entered correctly.

  8. Click Next to see a summary of your Connection Profile's details.

  9. Click Finish.

Your new connection profile will be added to your databases list in the Data Source Explorer view.

You can now use this Connection Profile to connect to your database.

See the Connecting to a Database topic for more on how to connect to your database.

The drivers for most of the database connection types are automatically included and configured in Zend Studio.

However, some drivers require you to manually add and configure the driver archive files.

The following driver types come bundled and pre-configured in Zend Studio:

  • DB2

  • SB2 i-series

  • Derby

  • MySQL

  • Oracle

  • Postre SQL

  • SQL Server


Instructions on how to complete a procedure

To create a connection profile:

  1. In the PHP Perspective toolbar, click the Create New SQL Connection icon
    -Or- in the Database Development perspective (Window | Open Perspective | Other | Database Development), click the Create New SQL Connection icon  in the Data Source Explorer view or on the main Toolbar
    -Or- right-click the Database Connections folder in the Data Source Explorer view and select New.

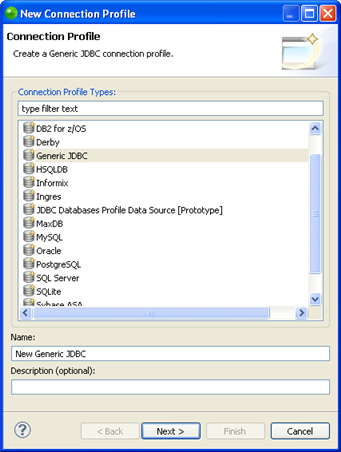
  2. The New Connection Profile wizard opens.

New Connection Profile Dialog

  1. Select the required connection profile type from the list.

Enter a name for the connection and a description (if required).

Note:

The drivers for most of the database connection types are automatically included and configured in Zend Studio. However, some driver types require you to manually add and configure the driver archive files.

The following driver types come bundled and preconfigured in Zend Studio:

  • DB2

  • SB2 i-series

  • Derby

  • MySQL

  • Oracle

  • Postre SQL

  • SQL Server

  1. Click Next.
    Select a driver from the drop-down list.
    If the required database driver has not been configured, click the New Driver Definition button to the right of the drop-down list and perform the following steps:

  1. In the Name/Type tab, select the required driver type and version.

  2. Select the Jar List tab.

  3. Click Add JAR/Zip.

  4. Browse to the JAR/Zip file containing the required driver files and click Open.

  5. Click OK.
    The new driver is added to the driver definition list.

  1. The properties for the selected driver are displayed.
    These will vary depending on the database type.

  2. Click the Test Connection button to ensure all the details have been entered correctly.

  3. Click Next to see a summary of your Connection Profile's details.

  4. Click Finish.

Your new connection profile will be added to your databases list in the Data Source Explorer view.

You can now use this Connection Profile to connect to your database.

See the Connecting to a Database topic for more on how to connect to your database.


Note:

To change the properties of your connection profile, right-click it in the Data Source Explorer view and select 'Properties'.

For more information on the Data Tools Platform, please see the Data Tools Platform User Documentation .

Note:

Additional user guides can be accessed from inside Zend Studio by going to Help | Help Contents, or from the Eclipse Online Documentation site (http://help.eclipse.org/neon/index.jsp).