Open topic with navigation
Working with Application Monitoring
This topics explains the procedures for working with Application Monitoring.
Enabling / Disabling Application Monitoring
This procedure describes how to enable or disable the Application Monitoring feature for an application.
Note:
Application Monitoring is enabled by default for any application deployed to Zend Server 5.6 or above.
|
|
|
|

|
To enable or disable Application Monitoring:
- From the Menu-bar, select Project | Properties | Application Monitoring.
- Select or clear the Enable Application Monitoring check box.
-OR-
- From the Menu-bar, select Window | Show View | Targets to display the Targets view.
- In the Targets view, expand the target, right-click the application and select Enable Application Monitoring or Disable Application Monitoring.
Note:
If you have already enabled Target Monitoring for the target, Application Monitoring is automatically enabled for all applications on the target. To disable Application Monitoring, you will need to disable Target Monitoring.
|
|
|
Configuring Application Monitoring
Application Monitoring notifications can be filtered by selecting the severity level of events warranting notification.These levels reflect your preferences, in terms of the importance of the event.
|
|
|
|
|
To select the severity level of events warranting notification:
- From the Menu-bar, select Project | Properties | Application Monitoring.
- Select the event severity level to filter incoming notifications:
- Info- Events expressing normal and expected Zend Server behavior. Example: Application Updated Successfully.
- Warning- Events expressing abnormal or unexpected Zend Server behavior. Example: Function Error.
- Critical- Events expressing critical Zend Server behavior. Example: Fatal PHP Error.
- Click Apply.
|
|
If your application is deployed to more than one target, the same severity settings are applied for each target. For more information on Zend Server Events, see the Zend Server User Guide.
|
You can make Zend Studio automatically hide notifications after a set period of time.
|
|
|
|
|
To set a time limit for notifications:
- From the Menu-bar, select Project | Properties | Application Monitoring.
- Select the Automatically hide notifications check box.
- In the Delay field, enter a time limit (in seconds).
- Click Apply.
|
|
Application Monitoring notifications will now disappear after the set time limit is reached.
|
Enabling / Disabling Target Monitoring
This procedure describes how to enable or disable Target Monitoring. Target Monitoring enables Application Monitoring for all applications associated with a specific target, and also for those that do not exist in your workspace.
|
|
|
|
|
To enable or disable Target Monitoring:
- From the Menu-bar, select Window | Show View | Targets to display the Targets view.
- In the Targets view, right-click the target and select Enable Target Monitoring or Disable Target Monitoring.
|
|
After disabling Target Monitoring for a target, you have the option to enable and disable Application Monitoring for an individual application associated with the target.
|
Configuring Target Monitoring
Target Monitoring notifications can be filtered by selecting the severity level of events warranting notification.These levels reflect your preferences, in terms of the importance of the event.
|
|
|
|
|
To select the severity level of events warranting notification:
- From the Menu-bar, select Window | Preferences | PHP | Targets Monitoring.
- Select the event severity level to filter incoming notifications:
- Info- Events expressing normal and expected Zend Server behavior. Example: Application Updated Successfully.
- Warning- Events expressing abnormal or unexpected Zend Server behavior. Example: Function Error.
- Critical- Events expressing critical Zend Server behavior. Example: Fatal PHP Error.
- Click Apply.
|
|
If your application is deployed to more than one target, the same severity settings are applied for each target. For more information on Zend Server Events, see the Zend Server User Guide.
|
You can make Zend Studio automatically hide notifications after a set period of time.
|
|
|
|
|
To set a time limit for notifications:
- From the Menu-bar, select Project | Properties | Application Monitoring.
- Select the Automatically hide notifications check box.
- In the Delay field, enter a time limit (in seconds).
- Click Apply.
|
|
Application Monitoring notifications will now disappear after the set time limit is reached.
|
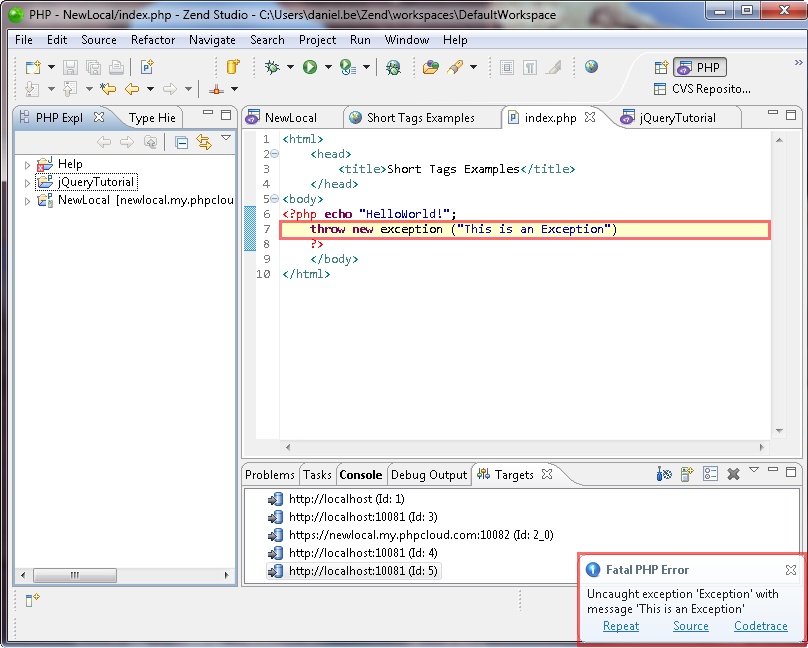
Analyzing Events with Application Monitoring
Application Monitoring will notify you of any server Event, according to the severity level you selected.
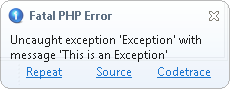
Subsequently, the following actions can be performed:
- Repeat- Reproduces the same request
- Source- Opens and displays the relevant file and code that triggered the Event
- Codetrace- Opens codetracing for the Event in Zend Server

©1999-2012 Zend Technologies LTD. All rights reserved.