![]()
To configure Zend Studio communication in Zend Server:
-
Open your Zend Server GUI.
-
Go to the Server Setup | Debugger tab.

-
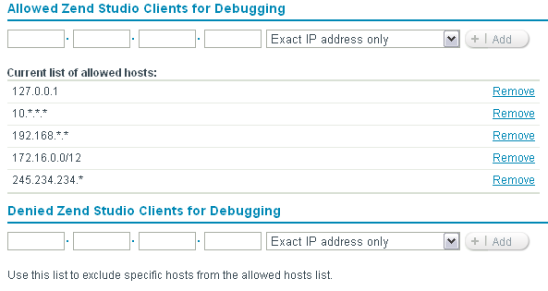
Ensure the address of your Zend Studio is included in the Allowed Hosts sections. This will ensure you can debug/profile Events.
To add an address to the list:-
Enter the IP address or Net mask of the machine on which your Zend Studio is installed .In Order to enter a Net mask, enter a range by entering the beginning of an IP address and adding '0' instead of the rest of the number. To make sure you are using Wildcards (*) to specify a range of IP's, select the pattern you want from the drop-down list.
-
Click Add. Your Zend Studio machine's address will be added to the Allowed Hosts list.
-
-
Ensure your Zend Studio's IP address is not in the Denied Hosts list.
If it is, click Remove next to the required address to remove it from the list.
-
Communication Tunnel Method
-
In the Zend Server GUI, go to the Server Setup tab | Monitor and configure the following:
-
Auto detect the Zend Studio Client Settings - Set to 'On' to inform Zend Server of the method of connection to Zend Studio. This allows Zend Server to automatically detect your Zend Studio Debug settings.
-
Click Save.
-
Restart your Web Server for the settings to take effect.

