Working with FileSync

The following procedures explains how to configure and run the FileSync plugin.

Prerequisites

How do I install the AnyEdit plugin?

Enabling and Mapping FileSync

To work with FileSync, you will first need to enable the plugin, and then map the source files and target folders.


Instructions on how to complete a procedure

To enable and map FileSync:

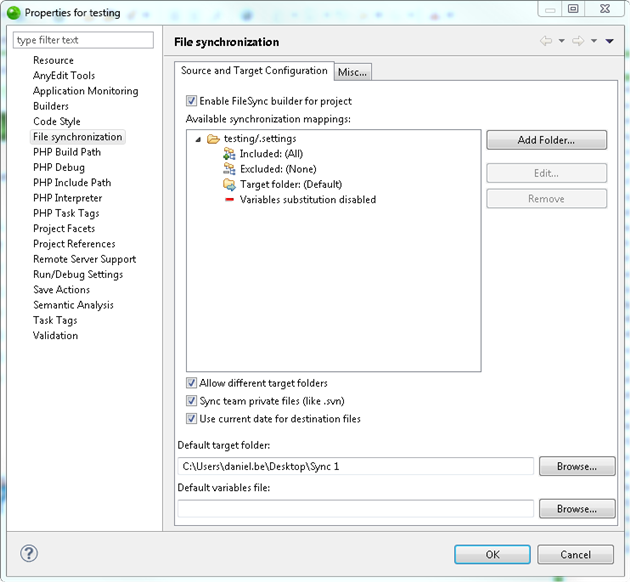
  1. From the Menu-bar, select Project | Properties | File synchronization.

  1. Select the Enable FileSync builder for project check-box.
  2. In the Source and Target Configuration tab, add folders to the Available synchronization mappings window by clicking Add Folder... and selecting the folders to be synced.
  3. Click Edit... to manually define exclusion and inclusion patterns.
  4. In the Default target folder field, click Browse... and select the destination folder for the synched files.
  5. Optional: If you wish to define a default folder for containing variables, click Browse... in the Default variables file field, and select a folder.
  6. Click OK.
    The folders added will be saved to the destination folder, and synced upon every Save you perform to your project.
  7. Select the Misc... tab for receiving support and sending feedback.

Note:

File synchronization works only in one direction - from Zend Studio outwards. Changes made on external files will not be reflected in your Zend Studio workspace.

For more details on how to work with FileSync, click here.

Manually Running FileSync

You can also manually run FileSync.


Instructions on how to complete a procedure

To manually run FileSync:

  1. In the PHP Explorer, right- click your project and select Force File Synchronization.
  2. If FileSync has not yet been enabled for the project, you will be prompted to enable FileSync:
    Click Yes to enable FileSync, and to auto-sync upon each Save action performed.
    Click No to sync mapped files once.

For more details on how to work with FileSync, click here.