Configuring a CVS Connection
Before you can add projects to or export projects from CVS, you must
define your CVS repository settings. This procedure describes how to configure
a connection to a CVS repository.
Prerequisites
How do
I install plugins in Zend Studio?
|

|
To add a new CVS repository:
-
Open the CVS perspective
by going to Window | Open
Perspective | Other | CVS Repository Exploring.
-
In the CVS Repositories
view, click the Add CVS Repository button  on the view's toolbar -or- right-click within the view and
select New | Repository Location.
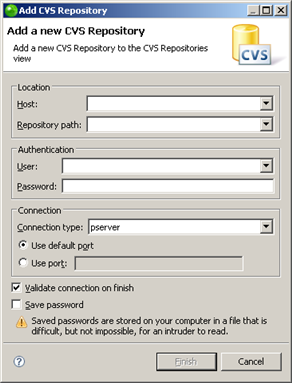
The "Add CVS Repository" dialog will open.

-
Enter the information
required to identify and connect to the repository location:
-
Host - The host address (e.g. mycomputer.com).
-
Repository path - The path to the repository on the
host (e.g /usr/local/cvsroot)
-
User - The user name with which you connect to the repository.
-
Password - The password for the user name.
-
Connection Type - The authentication protocol for the
CVS server.
There are four connection methods:
-
pserver
- a CVS specific connection method.
-
extssh
- an SSH 2.0 client.
-
pserverssh2
- provides a pserver connection over ssh2.
-
ext - the
CVS ext connection method which uses an external tool such
as SSH to connect to the repository.
-
Click Finish
to create your connection.
|
|
Your
CVS repository will now be added to the CVS Repository view.
|
See Creating
a CVS Repository Location in the Workbench User Guide
for more information.
Note:
Additional user
guides can be accessed from inside Zend Studio
by going to Help | Help Contents,
or from the Eclipse Online Documentation site (http://help.eclipse.org/helios/index.jsp).


