Open topic with navigation
Working with PHPUnit Testing
The purpose of this tutorial is to teach you how to create and run PHPUnit
tests on your code. You will learn how to create and run single unit test
cases and test suites containing a number of test cases.
Purpose and
Usage
Unit testing is a procedure to test your code to ensure that individual
units of source code are working properly and that the right output is
being generated. Tests can be run on all or some functions within files,
meaning that tests can be conducted before the file has been fully developed.
Each test case should be independent of others to ensure that test results
can pinpoint the location of the error.
Running unit tests can ensure that your code is stable and functioning
correctly, and can help you to diagnose errors.
Creating
a PHPUnit Test Case
Zend Studio will
automatically create test case files which can be run in order to check
the functionality of your code.
|
|
|
|

|
The
following steps demonstrate how to create a PHPUnit Test Case:
-
Create a new PHP
file, called "Calculator", and copy-paste the following
code into it:
<?php
class Calculator {
public function add($a,
$b) {
return $a + $b;
}
public function multiply($a,
$b) {
return $a * $b;
}
public function divide($a,
$b) {
if($b == null) {
throw new Exception("Division
by zero");
}
return $a / $b;
}
public function subtract($a,
$b) {
return $a - $b;
}
}
?>
-
Save the file.
-
In PHP Explorer
view, right-click the calculator file and select New
| Other | PHP | PHPUnit | PHPUnit Test Case.
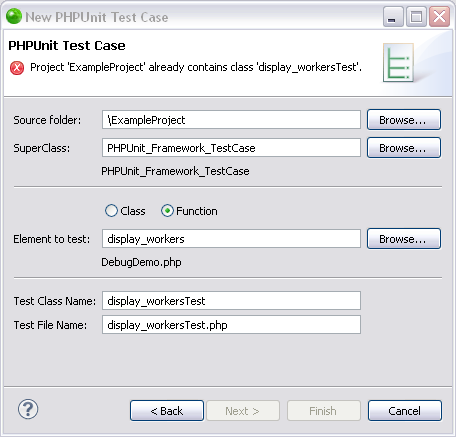
The PHPUnit Test Case dialog will
open.

-
The relevant information
will have already been entered (if not click the link in the
dialog to add the PHPUnit to the include path and this will
populate the "Element to Test" list). Note that
a new file will be created called CalculatorTest.php
A warning will also appear stating that the PHPUnit is not
the include class of your project.
-
To
add it to the include path, click the underlined Click
here link at the bottom of the dialog screen.
Once it has been clicked, the link and the warning message
will disappear.
-
Click Finish
to create your test case.
|
|
A
CalculatorTest file will have been added to your project in PHP
Explorer. This will contain tests for your original "calculator"
file.
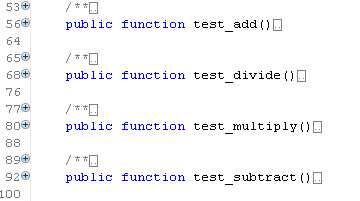
Note that all functions (add, multiply, divide and subtract) in
the original "Calculator" file will have a corresponding
test function in the "CalculatorTest" file:

|
Note:
Test functions will have been created, but parameters
need to be entered in order for the test to run effectively. For more
on this, see "Running your Unit
Test Case", below.
Back to Top
Running
your PHPUnit Test Case
Having created your PHPUnit Test Case, you will now need to customize
it by entering relevant parameters to be checked before being able to
run your test.
|
|
|
|

|
To
configure and run your test case:
-
In the CalculatorTest
file, expand public function test_add node.
-
Note
that a function has been created but no parameters have been
inserted. You will have to manually enter the relevant parameters
to be tested and the predicted results.
-
Delete the following
code:
//
TODO Auto-generated CalculatorTest->test_add()
$this->markTestIncomplete("add
test not implemented");
$this->Calculator->add(/*
parameters */);
-
This
is the default test which will return a "test not implemented"
result if the test case is run.
-
Replace
the above code with the following:
$this->assertEquals($this->Calculator->add(1,
2), 3);
-
The numbers 1
and 2 indicate that when the test case is run, the parameters
1 and 2 will be entered into the 'add' function in your Calculator
file (i.e. the test will try to add 1 + 2). The last number
(3) indicates that the expected result is 3. If the result
is something other than 3, the test will report a failure
for this function.
-
Save the file.
-
To run the unit
test, click the arrow next to the Run button  on the toolbar and select Run
As | PHPUnit Test
  –or-
go to Run Menu and select Run
As | PHPUnit Test –or-
go to Run Menu and select Run
As | PHPUnit Test  . .
Or- to debug the PHPUnit Test Case, click the arrow next to
the debug button  on the toolbar and select Debug
As | PHPUnit Test
  –or- from
the Main Menu, go to Run and select Debug
As | PHPUnit Test –or- from
the Main Menu, go to Run and select Debug
As | PHPUnit Test  . .
The unit test will be run and a PHP Unit view will open.
As the test is run, the parameters you have configured will
be entered into the relevant functions in the Calculator file
to test whether the correct result is outputted according
to the expected results you specified.
-
Four tests will
be displayed - one for each calculator function - which
should have passed successfully, as indicated by the green
tick icon  . .
Note that the other three functions (divide, multiply and subtract),
will have passed but will have a note indicating that they
have not been implemented. This is because you have not yet
specified the testing parameters.
-
Repeat steps 1-6
above for the remaining functions, entering suitable parameters
in the format:
$this->assertEquals($this->Calculator->subtract/divide/multiply(x,
y),z);
Select
each required operation (subtract, divide or multiply), and enter
variables where x and y are the two parameters which will be entered
into the calculator, and z is the expected result.
-
Run
the Unit Test again by clicking the Run Last Test button  in the PHPUnit view and
check that all the tests have passed successfully. in the PHPUnit view and
check that all the tests have passed successfully.
|
|
|
Notes:
-
Tests can be written in alternate ways. So for example
$this->assertEquals($this->Calculator->add(1,
2), 3);
can also be written as:
$this->assertSame(3,$this->Calculator->add(1,2));
-
You can create more than one test for each function,
so that your function could appear as the following:
Tests Calculator->add()
*/
public function test_add()
{
$this->assertEquals($this->Calculator->add(1,
2), 3);
// $this->assertEquals($this->Calculator->add(1,
3), 4);
// $this->assertEquals($this->Calculator->add(-1,
2), 1);
}
Back to Top
Analyzing Errors
Once a PHPUnit test has been run, the results can be viewed and analyzed
in order to diagnose and correct problematic sections of code.
|
|
|
|

|
The following steps demonstrate
how to analyze and correct errors in your code:
-
To
simulate a failed result, change the parameters under the
add function so that the expected result is wrong. For example:
$this->assertEquals($this->Calculator->add(1,
2),4);
-
Save the file.
-
Run the Unit Test
again by clicking the Run Last Test button  in the PHPUnit view.
-
The display in
the PHPUnit view will now display that test_add has failed,
indicated by the blue X icon  . .
The error message "Failed asserting that <integer:3>
is identical to <integer:4>" indicates that the
test failed as the actual result of the test was 3, but the
expected result was 4.
-
To only view the
failures, click the "Show failures only"  button on the view's toolbar.
-
Select a failed
result to view it in the Failure Trace view. Click the Filter
Stack Trace icon  to filter
the results and view the relevant functions. to filter
the results and view the relevant functions.
-
Double-click the
failed result to go to the relevant section in the code.
-
Correct the code,
save the file and run the test again by clicking the Run Last
Test button  in
the PHPUnit view. in
the PHPUnit view.
|
|
The
tests should be successful. If they are not, repeat steps 6-8.
|
Back to Top
Creating
and Running a PHPUnit Test Suite
A number of different PHPUnit Test Cases can be unified into one UnitTest
Suite file which will run all unit tests at once. This function is useful
if you have a few tests within a project which you would like to run at
once.
|
|
|
|

|
The following steps demonstrate
how to create a PHPUnit Test Suite:
-
Create another
Unit Test Case for your "Calculator" file by following
steps 3 - 7 under "Creating
Unit Test Cases", above.
-
Edit the test
file to create different tests using your own tests, or copy-paste
the example code into the file.
(Click
hereto
get the example code).
(See the "Working
with PHPUnit Testing"" Tutorial in Zend Studio's
Online Help for the example code.)
-
Save the file.
-
From PHP Explorer
View, select and right-click the Calculator project.
-
Select New
| Other | PHP | PHPUnit | PHPUnit Test Suite.
A New PHPUnit Test Suite dialog will open.
-
Ensure that both
your test cases are selected from the list.
-
Click Finish.
-
A new CalculatorSuite
file will be created, integrating both tests into one file.
-
Run the CalculatorSuite
by clicking the arrow next to the Run button  on the toolbar and select Run
As | PHPUnit Test
  –or- go to Run Menu and select Run
As | PHPUnit Test
  . .
-
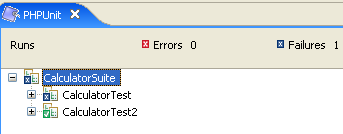
Both tests will
be run, with the results of both displayed in a tree in the
PHPUnit view at the bottom of the screen.

|
|
|
Back to Top
Generating
PHPUnit Test Reports
|
|
|
|

|
The following steps demonstrate
how to run a report on your Unit Test results:
-
Once you have run the PHPUnit
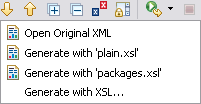
Test Suite, click the arrow next to the Generate Report icon
 on the PHPUnit
view's toolbar and select Generate
with 'plain.xsl' from the drop-down list. on the PHPUnit
view's toolbar and select Generate
with 'plain.xsl' from the drop-down list.
See PHPUnit Testing for more
on the different types of reports.

|
|
A
report will be automatically generated and opened in a browser
window.
|

©1999-2012 Zend Technologies LTD. All rights reserved.

![]()


