![]()
To run a PHP application on a virtual machine:
-
From the Right Click Menu of your project select Run As | Run as PHP Application on VM.
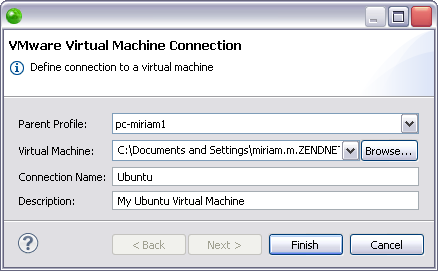
The VMware Virtual Machine Connection wizard opens.
Note:
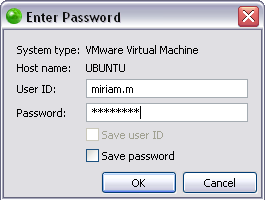
If you have already defined a virtual machine connection, choosing to Run as PHP Application on VM will open the Enter Password dialog (step 4).

-
The dialog contains the following components:
-
Parent Profile - The host computer.
-
Virtual Machine - The .vmx file that represents your virtual machine. This is produced after importing the ZendServer.zip image file into VMWare Workstation or creating a custom virtual machine image. Click Browse to locate the correct file.
-
Connection Name - The name you would like to give the connection.
-
Description - A field where you can insert an explanation of the defined virtual machine connection.
-
Click Finish to open the Enter Password dialog.

-
Enter the user ID and password of virtual machine that you are using. The Host name field allows you to see which system type and virtual machine the dialog is referring to.
Note:
A virtual machine created with the ZendServer.zip
image file has a pre-defined user ID and password:
-
User ID - studio
-
Password - logitech
The virtual machine powers on and the Run PHP Web Page dialog opens.
-
A URL is configured based on the default URL of a new server in the Run PHP Web Page dialog.
-
Click OK.
Your application runs on the virtual machine and the output is open in your Zend Studio.
To delete a virtual machine from your Zend Studio go to the Remote Systems view and from the Right Click Menu of your virtual machine select Delete.
You can now debug your application on your virtual machine.

