Open topic with navigation
Activating Tunneling
Once you have configured all the necessary settings in Zend Studio and on your server,
you can activate your Tunnel connection.
This procedure describes how to open a tunnel between Zend Studio and your remote
server.
|
|
|
|

|
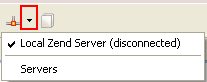
To activate Tunneling in Zend Studio:
-
Click the arrow
next to the Tunneling icon on the toolbar  and select the server which you configured for tunneling.
-
The tunneling
icon will turn green to show that a tunneling server
is connected: 
|
|
You
can now debug/profile on the selected remote server.
|
Note:
Several Tunneling sessions can be configured in Zend Studio. Therefore, if the
debug session is not working, check to see that the Tunnel to the correct
server is connected by clicking on the drop-down arrow next to the Tunneling
Icon  and verifying that the name of the
connected server is correct.
and verifying that the name of the
connected server is correct.

©1999-2013 Zend Technologies LTD. All rights reserved.
