Open topic with navigation
Setting Up Your Amazon EC2 Instance in Zend Studio
This procedure describes how to set up your Zend Server
Amazon EC2 Instance in your Zend Studio
to activate the functionalities of Amazon AWS Toolkit for Zend Studio.
Before setting up your Amazon EC2 Instance in Zend Studio,
you must meet all the prerequisites
and set
your environment as an allowed host on your Zend Server.
Entering
Your Amazon EC2 Credentials into Zend Studio
This procedure describes how to enter the Amazon credentials you were
given when opening an Amazon AWS Account into
Zend Studio. Inputting
these credentials is necessary in order to use the Amazon AWS Toolkit for Zend Studio.
|
|
|
|

|
To enter your Amazon EC2 credentials
in Zend Studio:
-
In Zend Studio
open the AWS Toolkit
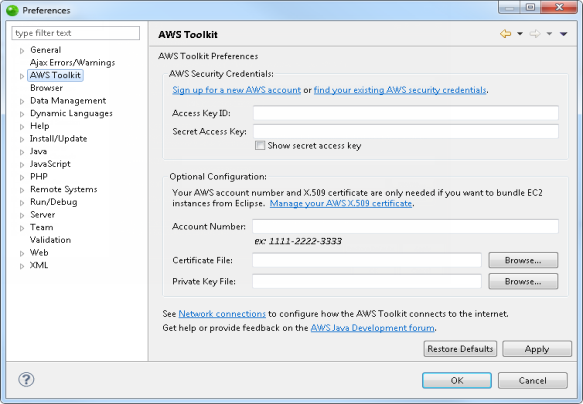
Preferences by going to Window
| Preferences | AWS Toolkit.
The AWS Toolkit Preferences page opens.

-
In the AWS Security Credentials section insert your
Access Key ID and Secret Access Key and click Apply
to save your settings.
Note:
These credentials are not
your Amazon username and password. They are separate credentials
that Amazon gives you when you set up an Amazon AWS account. For
more information on setting up an Amazon AWS Account see the Zend Server AMI User Guide,
available from the Zend Server on Amazon
EC2 Forum.
-
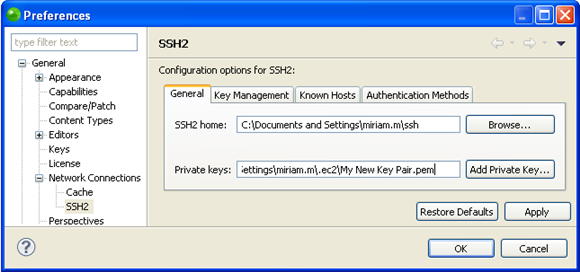
In the Preferences page go to General
| Network Connections | SSH2.
The SSH2 Preferences page opens.

-
In the General tab click Add
Private Key.
-
Browse to the location of your private key and select
it. For more information on private keys see Creating
a Private Key in Zend Studio.
-
Click Apply
and OK to apply
and save the settings.
Your Amazon Instance is now identified by Zend Studio,
and the Amazon
Toolkit views are available.
|
|
Before
using your Amazon EC2 Instance in Zend Studio
you must add
an Amazon EC2 Remote Connection Profile and enable
Tunneling for your Zend Server Amazon EC2 Instance.
|
Defining Your Region for
AMI’s
This procedure describes how to define your region for Amazon AWS Toolkit for Zend Studio.
The region you are in will change which AMI’s are available to you, which
you can see in the EC2
AMIs view.
|
|
|
|

|
To define your region for Amazon AWS Toolkit for Zend Studio:
-
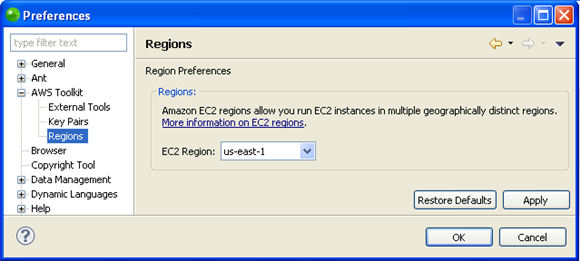
Go to the Regions Preferences page which is manually
accessible by going to Window
| Preferences | AWS Toolkit | Regions.
The Regions Preferences page opens.

-
Select your region from the EC2 Region dropdown menu.
-
Click Apply
and OK to apply and
save your settings.
Your region has been set.
|
|
The
AMI’s that are available in your region now appear in the EC2
AMIs view.
For information on which AMIs are available in each region see
the Zend Server on Amazon EC2 section
of the Zend website.
|
For more information on Amazon AWS Toolkit for Zend Studio
see the AWS Toolkit for Eclipse User Guide by going to Help
| Help Contents | AWS Toolkit for Eclipse User Guide or see the
AWS Forums.

©1999-2013 Zend Technologies LTD. All rights reserved.

![]()


