Updating Libraries
This page describes how to manually check for, and install, available library updates for deployed libraries in Zend Server.
Note:
Only libraries with a defined Update URL in their XML descriptor file can be updated. For more information, see Update URL below.
|

|
To update your libraries:
- Manually check for updates:
|
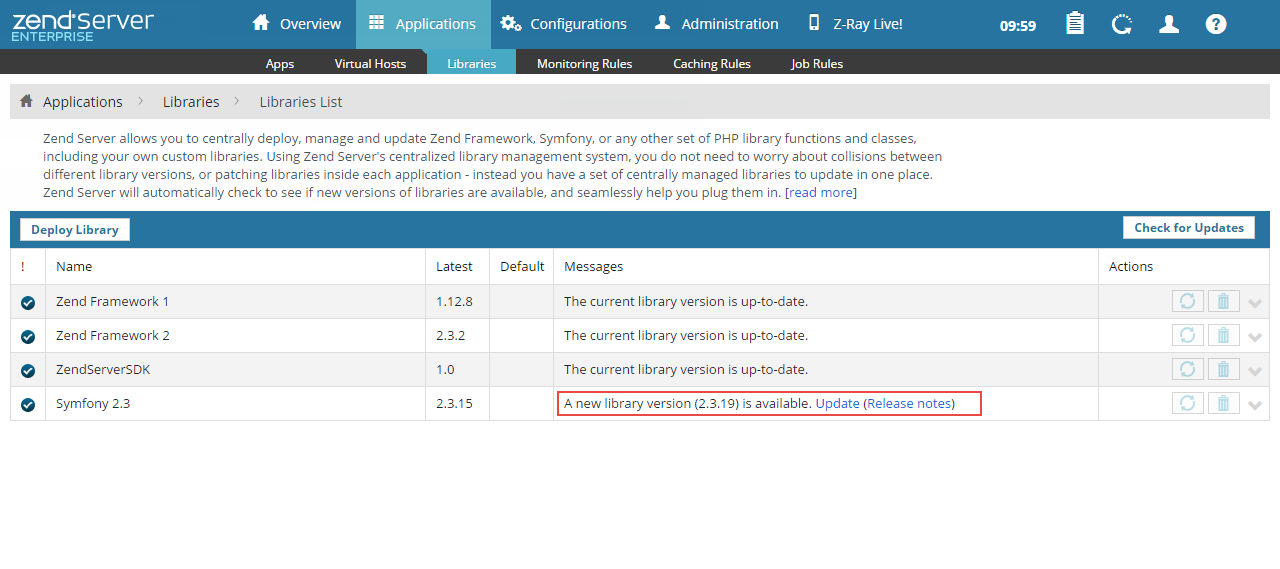
To check available updates for all installed library families:
- In the UI, go to the Applications | Libraries page.
- In the Action bar, click
 . .
Note:
This button will not be active if there are no libraries with an 'updateurl' value in their XML descriptor file deployed on Zend Server.
|
To available updates for a specific installed library family:
- In the UI, go to the Applications | Libraries page.
- Hover over, or select a library family, and click
 on the right. on the right.
|
|
Zend Server will check the update library repository for available updates. If there are any available updates, they are displayed in the Messages column in the Libraries list.
|
- In the Library Messages column, click Update.
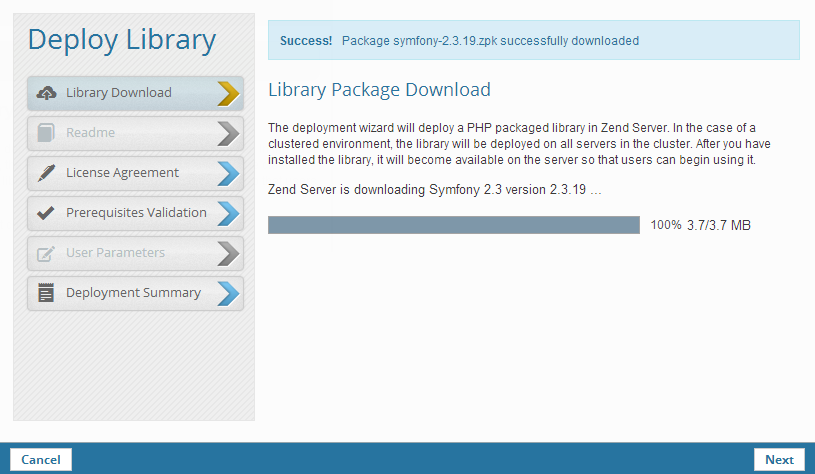
The Deploy Library wizard is displayed, and Zend Server downloads the library package. If this process fails, you can either retry, or manually download and deploy the library. Note: Zend Server will fail to download the library package if the Automatic Download feature is disabled. In this case, you will be directed to either enable the feature ('zend_deployment.auto_download' directive) from the Administration | Components page, or manually download the package for deployment.
Note:
The uploaded package determines which of the wizard dialogs are enabled. Deployment steps that were not defined in the application's XML descriptor file will be ignored by the wizard.
- Click Next.
The Readme dialog is displayed.
- Click Next.
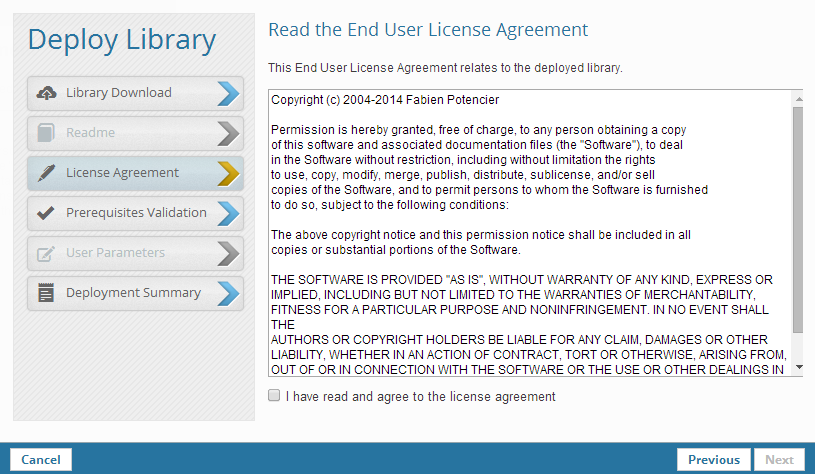
The License Agreement dialog is displayed.
- Mark the ‘I have read and agree to the license
agreement’ checkbox and click Next.
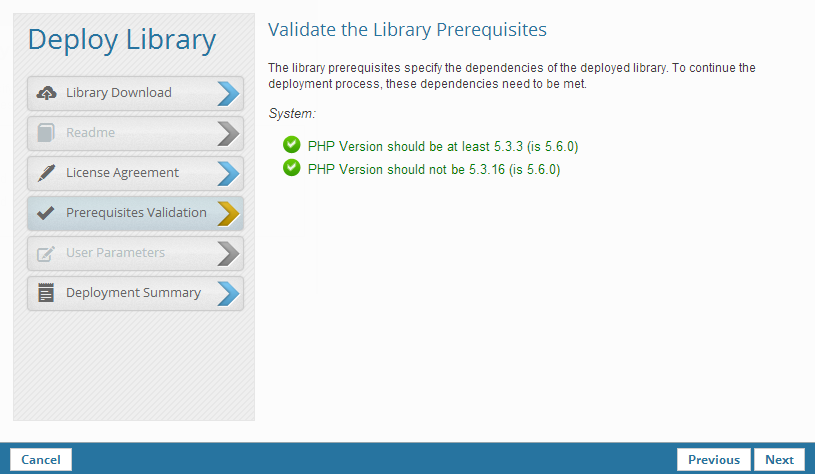
The Prerequisites Validation dialog is displayed.
- If your system does not qualify, an error message is displayed at the top of the dialog and the prerequisites in question appear in red. Click the link to open Zend Server in another tab in your browser, and then click Refresh after amending the specific dependencies.
If all the parameters
have been validated click Next.
The User Parameters dialog is displayed.
- The parameters and values that appear in this dialog are
the parameters, and their default values, which you defined
in your descriptor XML file, such as usernames and passwords.
Change any values that are different than the default, and click
Next.
The Deployment Summary dialog is displayed..
- The Deployment Summary dialog displays the details of the library to be deployed and a summary of the parameters
you have defined for the library. Select the Set as default version check-box to define the library as the default library version to be used by deployed applications with no specific library version call.
To change anything
on this page, click Previous
and change it on the dialog it appears.
Otherwise, click Deploy to deploy your library.
Your library is deployed and added to the Applications list on the Applications | Libraries page.
|
|
|
Note:
Zend Server automatically checks for available updates once a day, upon accessing the UI. If there are any available updates, you will be notified via the Notification Center.
|
Update URL
Only libraries that include an 'updateurl' value in their XML descriptor file can be updated.
The update URL runs the following script:
|

|
Update script: <?php header('Access-Control-Allow-Origin: *'); $result = array( 'version' => '2.2.0', 'downloadUrl' => 'http://downloads.zend.com/framework/2.2.0/ZendFramework-2.2.0.zpk', 'releaseNotes' => 'http://framework.zend.com/blog/zend-framework-2-2-0-stable-released.html' ); echo json_encode($result); ?>
|