Working with CVS
The purpose of this tutorial is to teach you how to work with the CVS
source control system. You will learn how to configure your CVS repository,
upload projects and files to it, check out (import) projects and files
from it and commit changes which you have made to files.
Purpose
A Concurrent Versions System (CVS) repository
is a source control system intended to allow a team or group to work on
the same files and projects simultaneously, and to be able to revert file
and project states back to previous versions.
Adding
a CVS Repository
Before you can add projects to or export projects from CVS, you must
define your CVS repository settings.
Note:
To access a repository, make sure that a CVS server
is already configured.
This procedure describes how to create a CVS repository connection which
you can access in order to be able to carry out CVS functionality.
|
|
|
|

|
To create a new CVS repository
connection:
-
Open the CVS perspective
by going to Window menu and selecting Open
Perspective | Other | CVS Repository Exploring.
-
Click the Add
CVS Repository button  on the view's toolbar -or- right-click within the CVS view
and select New | Repository
Location.
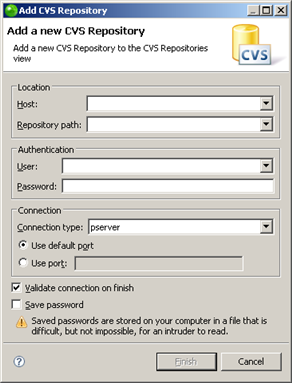
The Add CVS Repository dialog will open.

-
Enter the information
required to identify and connect to the repository location:
-
Host - The host address (e.g. mycomputer.com).
-
Repository path - The path to the repository
on the host (e.g /usr/local/cvsroot)
-
User - The user name with which you connect
to the repository.
-
Password - The password for the user name.
-
Connection Type - The authentication protocol
for the CVS server.
There are four connection methods:
-
-
pserver
- a CVS specific connection method.
-
extssh
- an SSH 2.0 client.
-
pserverssh2
- provides a pserver connection over ssh2.
-
ext
- the CVS ext connection method which uses an external
tool such as SSH to connect to the repository.
-
If the host uses a custom port, enable
Use Port and enter the port number.
-
Click Finish
to create your connection.
|
|
Your
repository will be displayed in the CVS Repositories view.
|
Back to Top
Sharing Projects
Through CVS, projects can be shared and worked on by numerous team members.
|
|
|
|

|
This procedure demonstrates how
to upload a project you have created so that other users can work
on it:
-
Create a new PHP
project called "MyCVS Project".
-
Within the project,
create a PHP file called "CVSFile1" with the following
code:
<?php
//This is a new file
?>
-
In PHP Explorer
View, right-click your project and select Team
| Share Project.
A Share Project dialog will open.
-
From the repository
list, select CVS and click Next.
-
Select 'Use existing
repository location', and select your CVS repository from
the list.
-
Click Next.
-
In the Module
Name dialog, select 'Use project name as module name'.
-
Click Next.
-
Depending on your
authentication settings, a dialog might appear asking you
to provide authentication information.
Re-enter your password and click Next.
(Mark the Save Password checkbox to ensure that this screen
does not reappear.)
-
The 'Share Project
Resources' dialog will open.
Your project will be displayed as a resource that is to be
added to CVS. The purple plus icon  indicates
that these are new files that have not previously been added
to CVS. indicates
that these are new files that have not previously been added
to CVS.
-
Click Finish.
A Commit dialog will open.
-
Enter the comment
"I am uploading files to CVS." and click OK.
-
In PHP Explorer
View, your project will now have a repository icon  ,
indicating that it is in CVS. ,
indicating that it is in CVS.
-
Once you have
committed your files, other team members will be able to access
and change the files.
|
|
The
instructions below explain how users can check out (import) projects
from CVS, edit them and upload their changes.
|
Back to Top
Checking
Out Projects from CVS
Once projects are placed on the CVS repository, they can be checked
out (imported) by anyone with access to that repository.
|
|
|
|

|
This procedure demonstrates how
to import (check out) projects from CVS into your workspace:
-
Delete the 'MyCVS
Project' from your workspace in order to simulate being a
new user who has not previously had access to this file.
Note: Deleting the project from your workspace will
not delete it from CVS.
-
Go to File
| Import | Projects from CVS.
-
Click Next.
-
Select your repository.
-
Click Next.
-
Select the 'Use
an existing module' option to see all the available projects
under that directory.
-
Select the 'MyCVS
Project'.
-
Click Finish.
|
|
The
project will now be added to your workspace and will be displayed
in the PHP Explorer view.
Note the repository icon  next
to the project in PHP Explorer view, indicating that they it is
sitting in a CVS repository. next
to the project in PHP Explorer view, indicating that they it is
sitting in a CVS repository.
|
Back to Top
Adding Files to Existing
Projects
You can add files to existing projects in the CVS repository and commit
them so that other users can access them.
|
|
|
|

|
This procedure demonstrates how
to add and commit a file into an existing project:
-
In your MyCVSProject,
create a new PHP file, called "CVSFile2", with the
following code:
<?php
//Another new file
?>
-
Save the file.
-
In PHP Explorer
view, select the file, right-click and select Team
| Commit.
-
A Commit dialog
will open.
Enter a comment "Another new file added." and click
OK.
-
The file will
be committed to CVS and will be accessible by other users.
|
|
Note
the  icon next to the file, indicating
that it is sitting in a CVS repository. icon next to the file, indicating
that it is sitting in a CVS repository.
|
Back to Top
Making
Changes, Comparing Changes, and Committing Changes
Once files are stored on CVS, you and all other team members can make
changes to the files and commit them. Before committing changes you have
made to a file, you can compare the file stored locally in your workspace
to the file stored on the CVS repository.
Making and Comparing Changes
|
|
|
|

|
This procedure demonstrates how to
make changes to files and compare the newly edited local files
to files in the repository:
-
Open CVSFile1
in your MyCVS Project.
-
After the text
"This is a new file." add "I have made a change".
-
Save the file.
In PHP Explorer view, the file and project will have a ">"
suffix, indicating that a change has been made which has not
yet been committed.
-
So far, the changes
have only been saved in your workspace. In order to compare
the local file to which you have made changes with the one
sitting in the CVS repository, right-click the file in the
PHP Explorer view and select Team
| Synchronize with Repository.
-
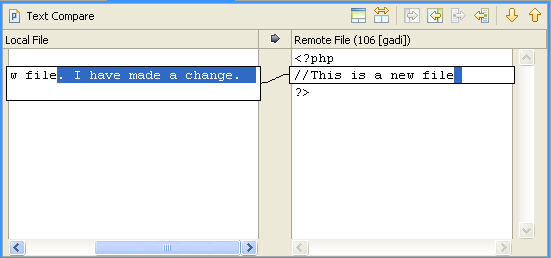
A Text Compare
dialog will open showing the local file you have just made
changes to (in the left-hand window) as compared to the file
in the repository (in the right-hand window).
The change you have made will be highlighted.

|
|
|
Committing Changes
Once you have edited your file and compared it to the one in the repository
to ensure that the changes are correct, you can commit your changes.
|
|
|
|

|
To commit your changes to the repository:
-
In PHP Explorer
View, right-click your file and select Team
| Commit.
-
A
Commit dialog will open.
Enter the comment "I have made changes to CVSFile1."
and click Finish.
-
Your
changes will now be committed to CVS and all users will be
able to access the newly updated file.
|
|
|
Note:
If you had made changes to a number of files, you can
use the Synchronize view, within the Team Synchronizing Perspective, to
view and commit all your changes at once.
Back to Top
Replacing Files
with Older Versions
Using CVS's version control system, users can revert back to older versions
of files if incorrect or irrelevant changes have since been made.
|
|
|
|

|
This procedure demonstrates how
to replace your file with an older version from CVS:
-
In PHP Explorer
view, right-click your CVSFile1 and select Replace
with | History.
-
A History view
will be displayed, listing the times that the file has been
committed. The changes made on CVS (as opposed to local workspace
changes) will be shown with a repository icon. 
As committed changes have been made twice (once during the
original upload and once when you edited the file), 2 CVS
revisions should be listed with their relevant comments.

-
To open the Text
Compare view to see the previous version of the file, double-click
the second CVS revision in the list (containing the comment
"I am uploading files to CVS.") This is the original
state the file was in when it was first uploaded.
-
To return the
file to its previous state, select the second revision again,
right-click and select Get
Contents.
-
Your file will
be replaced with the contents of the previous version of the
file (without the line "I have made a change.")
|
|
|
Back to Top
You can delete a file from the CVS repository by first deleting it from
your workspace and then committing the deletion.
|
|
|
|

|
This procedure demonstrates how
to delete a file from CVS:
-
In PHP Explorer
view, right-click CVSFile2 and select Delete.
-
Click Yes
when asked to confirm the deletion.
-
In PHP Explorer
view, right-click MyCVS Project and select Team
| Synchronize.
-
The Team Synchronizing
Perspective will open.
The file you have deleted will be displayed with a purple arrow
with a minus sign. 
-
Right-click the
file and select Commit.
-
A Commit Deletion
dialog will open.
Enter a comment "Deleting CVSFile 2."
-
Click OK.
-
The file will
be deleted from CVS.
|
|
|
Note:
This action will delete the file from the CVS repository
and not just from your workspace. This file will no longer be accessible
by any users.
Back to Top

![]()
 on the view's toolbar -or- right-click within the CVS view
and select New | Repository
Location.


