![]()
To create a PHPUnit Test Case:
-
In PHP Explorer view, right-click the file containing the classes you would like to test and select New | Other | PHP | PHPUnit | PHPUnit Test Case.
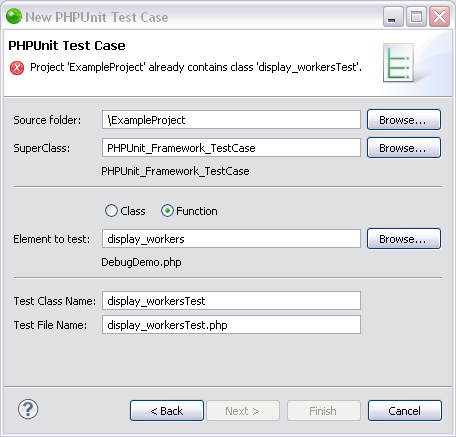
The PHPUnit Test Case dialog will open, with relevant information already entered into the various fields.
Note that a new file will be created called "FileName"Test.php

New PHPUnit Test Case dialog
-
A SuperClass is a class from which the new PHPUnit Test Case will inherit functionality (e.g. setup and constructors). If necessary, click Browse next to the 'SuperClass' field to select a different PHPUnit Framework SuperClass.
-
Click Browse next to the 'Element to test' field to select the Class or Function which will be tested in the new PHPUnit Test Case.
-
If this is the first PHPUnit Test created for the project, a warning will appear stating that the PHPUnit is not on the include path of your project.
To add it to the include path, click the underlined "Click here" link at the bottom of the dialog screen. This will enable PHPUnit Content Assist options in the PHPUnit Test.
Once it has been clicked, the link and the warning message will disappear. -
Click Finish to create your test case.
-
The new test file, containing tests for the selected elements, will be added to your project.
Note that all relevant functions in the original class will have a corresponding test function in the test file.
However, test functions will have been created with no parameters. -
Before you can run your test file, you must create relevant tests and parameters for each of your functions, depending on the results you expect to see when the function is run. For each function, write a test with demo input parameters and the expected result. When the test is run, Zend Studio will insert these parameters into your original file's functions to see if the result is as expected.
Once you have completed the file by creating relevant test functions and inserting parameters, your PHPUnit test case is ready to be run.

