Open topic with navigation
Upgrading Zend Studio
There are two methods for upgrading Zend
Studio:
-
Installing the most up to date Zend Studio package from the
Zend
Website. For more information see Installing
Zend Studio.
-
Updating an existing Zend Studio Installation.
If you have an existing Zend Studio installation, you can upgrade using
Zend Studio’s Update Manager, which allows you to update your existing
plugins and features.
Updating an Existing Zend Studio Installation
This procedure describes how to upgrade Zend Studio when there is already
a previous version installed.
Notes:
Major version upgrades can only be performed when upgrading from Zend Studio 9.x to Zend Studio 10.x. Major upgrades for previous versions are not supported.
Upgrading to Zend Studio 10.0 from the Beta version is not supported.
In order to update you should sign on to your operating
system with the same user permissions that were used during the initial
installation of Zend Studio.
|
|
|
|

|
To update an existing Zend Studio installation:
-
Launch Zend Studio.
-
From the Menu Bar, go to Help
| Check for Updates.
The Contacting Software Sites screen opens with a progress
bar as it searches for available updates.
-
If there are any updates, the Available Updates wizard
opens.

-
Select which updates you would like to install and click
Next.
The Update Details dialog opens.
-
Review and confirm the updates that are waiting to be
installed and click Next.
The Review Licenses dialog opens.

-
Review the licenses and select the ‘I accept the terms
of the License Agreement’ checkbox and click Finish.
The Update screen opens with a progress bar of the updates.
-
From this screen you can:
-
Run the update in the background -
Choose to run the updates in the background by clicking Run in Background or select
the ‘Always run in background’ checkbox to save your choice
for the future.
-
Cancel the update - Click Cancel
to cancel the update.
-
Expand/collapse the update details - Click
Details to expand
or collapse the details of the update.
The progress bar will close when the updates are complete.
-
When prompted, restart Zend Studio.
Zend Studio
restarts with the updates installed.
|
|
Important!
If you are upgrading from Zend Studio 9.x to Zend Studio 10.x you will need to change the URLs for the automatic update sites. See below for more information.
|
Changing the Update Sites
This procedure explains how to change the URLs of the Zend Studio update sites to make sure you have the updated list of extra plugins, and for future updates.
Note:
Only applicable when upgrading from Zend Studio 9.x to Zend Studio 10.x.
|
|
|
|

|
To change the URLs for the update sites:
- In the menu-bar, go to Window | Preferences | Install/Update | Available Software Sites.
The Available Software Sites preferences dialog is displayed.
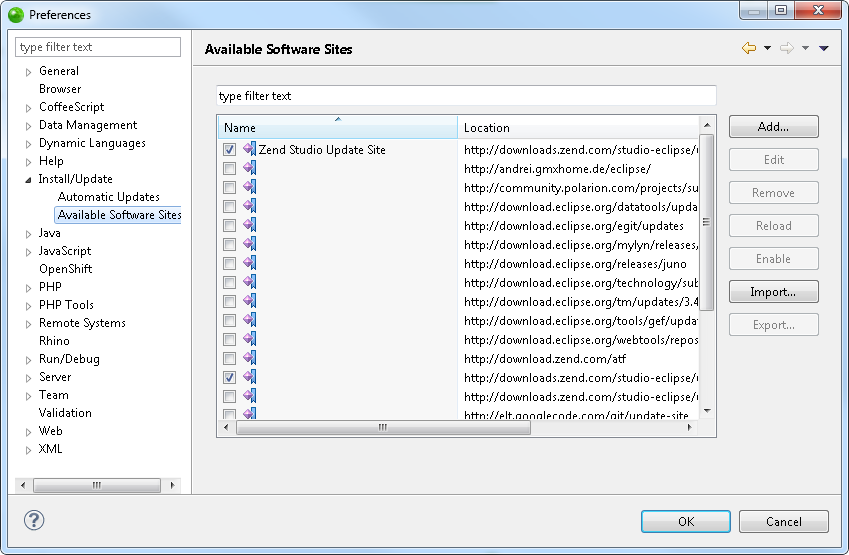
- From the update sites list, select the Zend Studio Update site (http://downloads.zend.com/studio-eclipse/updates/9_0), and click Edit.
The Edit Site dialog is displayed.
- Change the URL to 'http://downloads.zend.com/studio-eclipse/updates/10_0', and click OK.
- From the list of update sites, select the Zend Studio Extra Details site (http://downloads.zend.com/studio-eclipse/updates-extra/9_0), and click Edit.
The Edit Site dialog is displayed.
- Change the URL to 'http://downloads.zend.com/studio-eclipse/updates-extra/10_0', and click OK.
- In the Available Software Sites preferences dialog, click OK to apply changes.
|
|
|
Importing Remote Connections
Zend Studio now
allows you to import remote connections, ensuring that the upgrade to
a newer version of Zend Studio
does not disrupt your existing connection configurations.
|
|
|
|
|
To import remote
connections from your old workspace:
-
On the Welcome Page, click Import
remote connection
-OR-
Go to File | Import.
The Import dialog is displayed.

-
Select Zend Imports
| Remote connection import and click Next.
The Import remote connection dialog is displayed.

-
Click Browse to select
the workspace containing your remote connection
configurations.
The available connections are displayed in the window below.
-
Click Finish.
Your old connection configurations are imported into your workspace.
|
|
|
Post-Upgrade Checklist
Note:
Only applicable for users upgrading from Zend Studio 9.x to Zend Studio 10.x.
Because Zend Studio
10.x incorporates a number of new features and changes, and some
users upgrading from previous versions may experience some compatibility
issues that can be easily worked around by completing all, or some, of
the actions listed in the table below.
If you are able to contribute further information, a solution or workaround
to any of these known issues, we would certainly appreciate hearing from
you via the forums.
|
Action
|
Action Description
|
Issue Name
|
Issue Description
|
|
Install
plugins
|
Zend Studio now allows you
to customize your workspace by
manually installing and uninstalling the various extra plugins.
How
do I install plugins in Zend Studio?
What plugin are available for installation?
|
Missing plugins
|
After upgrading
your version of Zend Studio
you find that various plugins are not part of your installation.
|
|
Import
projects
|
Zend Studio enables you
to easily import your old projects and files into your new workspace.
How
do I import projects into my workspace?
|
Missing projects
|
After upgrading
your version of Zend Studio
you find that your old projects are no longer part of your workspace.
|
|
Import
remote connection
|
Zend Studio enables you
to import previously configured remote connections.
How
do I import a remote connection into Zend Studio?
|
No remote connections
|
After upgrading
your version of Zend Studio
you find that your previously configured remote connections are
no longer valid.
|
|
Re-configure
SVN connection
|
How
do I configure an SVN connection?
|
Lost SVN connection
|
After upgrading
your version of Zend Studio
you discover that your connection to a remote SVN repository is
no longer functioning.
|
|
Insert
new license
|
Zend Studio 10
requires a new license key.
Depending on your current SLA and your
license expiration date, you may have received a free license
upgrade. To see whether this is the case, login to My Account and open the Licenses tab:
-
If you can see Zend Studio 10 in the list, it means that
your license has been upgraded and you can get the license
key by clicking the Get License link.
-
If Zend Studio 10 is not in the list, go to the Renewals
tab. If you are eligible for the renewal, you will see a Renew
License link. This link will take you to Zend
Online Store with the product in your basket.
|
Zend Studio 9.0 license
key not working
|
After installing
Zend Studio
10.0, you attempt to insert your old Zend Studio
9.0 license key only to find out that this does not allow you
to work with the program.
|

©1999-2013 Zend Technologies LTD. All rights reserved.
